Hello everyone!
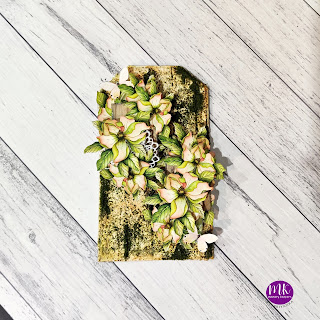
I am Priyanka from Memory Keepers and today I am gonna share with you my latest creation of a mixed media spring themed tag and if you scroll down, you will find a pictorial on how I made this tag. Do let me know in the comments how you like it ⬇️⬇️⬇️
Step by step instructions-
1. Take two pieces of Chipboard around 7x3.75 inches and cut them in a tag shape.
2. Stick them together
3. Then take small strips of Chipboard( approx 0.75 inches) and paste them on top of the tag as shown in the picture below, making sure you cut the top left and right corners just like the base. This should look like a wooden plank now.
4. Then apply two coats of white gesso on the whole tag and make sure to cover the grooves as well. Also apply one coat of white gesso on the clay pieces. Let it dry.
5. Then take any texture paste and add sand to it( you can also take sand texture paste if you have).
6. Then with the help of palette knife, apply a thick coat on the whole tag. Remove the excess paste from the grooves with the knife itself so that it is highlighted. Let it dry.
7. Apply shades of brown color( diluted) on top of the tag and let it dry
8. Then sprinkle some dry moss powder on top of the tag and use a brush with water to spread it everywhere.
9. This will give it a shade of yellow and prepare the base( as I wanted it). It should look something like shown in the picture below.
10. Apply a thick coat of gel medium here and there on the tag
11. Sprinkle the green moss powder on the gel medium so that it's covered as shown in the picture below
12. Now take the clay pieces ( I have divided one step into two) and start building the structure on both sides as shown. Paste the flower clusters before and above the clay pieces to make different layers. Stick them with the help of glue gun.
13. Stick two small pieces of wooden texture paper ( distressed and inked with black soot)
14. Then stick other clay pieces on top of the paper as shown in the picture below. You can color the bigger clay pieces with green watercolor so that it merges with the background.
15. Start layering the flower clusters and butterflies here and there using foam tape or leftover chipboard pieces
16. Also apply a layer of brown water color on top of the clay pieces only on the raised edges
17. Then build up the layers using more flower clusters on both sides to give it a balanced look. Keep adding until you are satisfied
18. To connect both the sides and use a focal point I have used 3D vintage clock chippies in the center which is embossed with black color on the base. I have put more flower clusters on top of the clock chippies.
19. Then stick two paper flowers around the clock and complete the look with filler flowers. This gives it a more realistic look and binds the whole composition.
20. Put more butterflies, top with a sentiment and put some golden pearls
Ta-da...our tag is ready!!!)
Take a look at some close up pictures of the tag😍🥰
Do tag me if you recreate this... Would love to see your creations🥰🥰


No comments:
Post a Comment